


BUSHCRAFT
A brief look at shelters, fire making methods and types of fires, foraging,
wild edibles, and some useful plants and trees found in Scotland.
Shelters
As with your camp fires, with any shelter, make sure it's placed where nothing can fall on you from above such as overhead branches, boulders or rocks from crags or overhangs. Ensure the ground is level and clear of debris, and there are no ant, or bug nests nearby. Always properly assess your surroundings, where your shelter is going, what direction the wind and/or rain is coming from, how big an area you need, what supplies i.e source of clean water, dead standing wood for fires, type of ground etc. i.e is it dirt or peat, and what evacuation points are nearby should you need them. Always plan your camp layout beforehand to save time, energy, and always, put your safety first, folks.

Tent Systems.
Tents come in every shape and size imaginable from single man bivvy tents, single man dome tents, two man domes etc, right up to large 6-8 man family tents. Obviously when you're out in any wildlife, camping, or bushcraft situation the first priority has to be some form of shelter to give you protection from the elements and somewhere that you can build up a camp around. Your type of camp will depend on your surroundings and how long you plan on staying in that area. Always, shelter, fire, water, food. If you can establish these four things then you greatly increase your chances for comfort, and in a survival situation, your chances you will live.
_edited.jpg)
Tarp and Hammock
Slightly more to carry than a tarp, but not much. Still a very quick shelter to put up. Make sure you pick two decent trees to rope to, check there are no possible dead overhead branches that might fall on you if the weather turns bad. Make sure your hammock and tarp are secure. Don't place your fire where it can send embers into your sleeping bag. Common sense again, folks. Only downside is that Your top half is snug under your sleeping bag and blanket, but you sometimes get a cold back because there is nothing underneath to trap warm air and protect you against the cold. I usually hang another blanket underneath and try and secure it to the tarp ends so that there is a layer for air to build up between my back and the outside. Simple solution, but I have had warmer nights sleep this way.

Basic Tarp
This is the lightest way I know to travel, and have used this method a number of times. I usually place my tarp closer to the ground though, to help keep the wind and cold out. You can make a timber wall out of short branches and supports at one end ( like a fire reflector ) and lay a longer branch along the side of the tarp on the ground to help keep wind out. As with the 'Bushcraft Shelter' you could make a raised bed under the tarp, and put a fire and heat reflector near the open end of the tarp shelter to keep you warm at night. This is a great way to make a quick basic shelter. All you need to carry is your tarp and plenty of parachord and some basic knots. In my videos I will cover different tarp set-ups I use.
.jpg)
Wilderness Bushcraft Shelter
There are many types of bushcraft shelter and it's only down to experience, imagination and whatever resources you have around you that determine what shelter you have. Although, there are some key factors you should consider. I always make sure I am raised off the ground and use six short 'Y' shaped stripped branches and hammer them into the ground as supports for the size of bed I want. I then lay longer straight stripped branches across these and lash them down. I then cover this with small branches that still have their leaves on and if available cover this with a layer of dried sphagnum Moss. This will give you a comfortable bed. Right, the shelter: As I said this depends on your surroundings. I try and find four 'Y' branches of equal height, strip them and hammer them into the ground. Then I tie cross branches in along the top, so with the bed underneath the shelter now looks like a four-poster bed. Then, like the bed base, place more branches along the roof, back and sides. You can use a similar technique like used when making a fire reflector and make the walls of the shelter up like that, this will give it added strength. Then just cover and camouflage with branches, leaves etc. When I've had to build any shelters like this I try and place my fire in front of the shelter then a heat reflector 'wall' behind that to send the heat from the fire into my shelter. The smoke will also help keep the bugs away.Leave a little space so you can get in and out without stepping on, or falling into the fire. Be careful you don't set fire to the shelter roof. Common sense.
Fire Starting

Ferrocenium Rod.
For years I used to use the Magnesium Fire Stick, but this Fero Rod has become my number one go to tool now as it's even better than any magnesium Stick I've had, even my 'Ray Mears' one. It's an amazing addition to my kit and I just love it. It's 6" long and hasa diameter of 1/2". It has a 4mm Lanyard Hole, use it to keep product secure and together. It gives up to 3000 degrees C spark in any weather, at any altitude. Durable, lasts for approximately 12,000 strikes. Amazing firelighting tool.

Magnesium Fire Stick
You can use the metal blade that came with the fire starter kit or the back of a steel knife blade to scrape the corner of the block. Continue scraping until you have a small pile of magnesium shavings about the size of a medium-sized coin. Keep the pile of magnesium shavings on a dry leaf or other dry and flat surface. Strike the flint with the back of a knife's blade. Keep the end of the flint pointed just above your pile of magnesium shavings when striking so that the sparks you produce will land on your pile of magnesium. Keep striking the flint until the pile of magnesium shavings catches fire. For me, to be honest I have found this method is only as good as the quality of the magnesium kit you are using. I picked up a fire kit after losing a good one, and had trouble getting any kind of fire at all with that, and reverted to a regular camping stove. I found that the best one was from 'Ray Mears' 'Woodlore' company, and was heads above the previous ones I owned.

Flint, Steel & Charcloth
This is my favourite and easiest method of fire lighting I know and I have used this technique for many years and it has never let me down. If I'm hiking and see a good piece of flint I'll pick it up and add it to my pouch for prepping later. Also collect various types material to help create tinder and make more charcloth. Whenever I come across it I like to use 'Horseshoe Fungus', also known as 'Horse's Hoof Fungus'. ( 'Spongan' - Gaelic ) ( 'Fomes Fomentarius' - Latin ). This can mostly be found on Birch trees, but sometimes on Beech and even Sycamore. It's brilliant if you want to transfer a fire from your last campsite to the next if wild camping as it smoulders for ages. To prep for charcloth you'll need to remove the hard outer layer and cut the next layer into slices and then 'cook' inside your char tin until it stops 'smoking'. Charcloth is basically any a swatch of fabric made from vegetable fiber such as linen, cotton or jute ( I have used old cotton T shirts passed their best ) that has been converted via pyrolysis into a slow-burning fuel of very low ignition temperature. Also, be careful when prepping any new found flint, or when striking for a fire. If you hold the flint wrong it's possible to cut yourself. Cuts can quickly become infected when out in the wild.
Safety must always come first, folks.
_edited.jpg)
Indian Bow Drill
A tried and tested method or 'friction' fire-making used for thousands of years by many indigenous peoples across the globe.
Basically, any form of constant rubbing of two combustible materials together until the friction takes the material beyond its auto-ignition temperature and creates an ember which is then used to ignite a fire. I have made and used this method a few times now, and although it can sometimes feel like a lot of effort, it usually works. You will need to make four parts to this. try NOT to take 'live' wood. Look for dead standing wood that hasn’t started to decay yet, it should break free from the tree with relative ease, sometimes without the need to use a knife. As with any fire you make you will need to prepare your tinder and kindling.
The Drill
The drill should be around 20cm in length and between 2cm and 3cm in diameter and as straight as possible. The end of the drill that will be in contact with the hearth needs to be carved into a blunt point; while the end that is in contact with the bearing block needs to be carved to a sharper point – this will help to reduce the friction between the drill and the bearing block. I like to use Hazel for my drills, as much of this is already straight, so easier to make a drill from with little effort.
The Hearth
The hearth is essentially a rectangular block. It should be about as thick as the diameter of the drill, around 40mm wide and 30cm long. You can use the same type of wood as the drill, or some other suitable wood that helps in the process of creating an ember. I find that Ivy makes a good hearth and it crumbles into a fine dust ember. I've also used Pine in Scotland because of the resin, but one of my favourites is Sliver Birch (Betula Pendula) . The Birch tree is probably every bushcraft lovers favourite tree and can be used for a variety of things from bow drills, drinking vessels and water catchers right up to birch-bark canoes.
The Bow
For the cordage I have a good long boot lace that I keep for tying the bow string. You could make your own wild cordage if in a survival situation, i'll make a video on how to make wild cordage from some trees etc found in Scotland. The body of the bow itself can be made of any wood that you have at hand, but It needs to be slightly curved and should measure the length of your fingertips to sternum.
The Bearing Block
Carve the bearing block so that it fits comfortably in your hand. It can be made of any wood that you have at hand, even a stone with an indent will do.Place a thinner piece of wood or a leaf underneath the grove on the Hearth to catch the ember and then transfer the ember to your tinder.
Once you have carved and prepared your bow and your fire material place each element in order as per the photo above. The Bearing block in the hand you will use to push down onto the drill for friction. The drill between the bearing block and the Hearth. You'll need to twist the drill around the string of the bow before putting in place onto the Hearth. Once you are properly lined- up, start with slower movements to 'burn in' the drill to the hearth. Then you take your knife and make a small triangular grove or cut-out on the hearth just in front of your burn mark. Then place a leaf or small piece of bark underneath the hearth at this point. This will catch the ember so you can transfer it to your tinder. Now, to make the fire itself. Push down on the hearth and making forwards and backwards movements with the bow try and be steady and constant, getting quicker as you go. This will help generate lots of dust that will build up and create an ember, falling into the grove on the hearth onto the leaf. Look out for smoke and a light glow from the ember. carefully transfer it to your tinder 'nest' and start to gently blow. Hold it and position your face so that the smoke from this goes away from your face and not into your eyes. Once the 'nest' takes flame transfer to your fire and add kindling small pieces at a time to allow oxygen to help encourage the fire.
.jpg)
Rubbing Sticks Together
Basically, similar to the Bow Drill, in that you are rubbing sticks together to make friction and create an ember.
All you need here though is just a Hearth, a straight (ish) stick to push up and down along the Hearth and a collection method such as a flat piece of wood or a leaf etc to catch the ember.
Whenever I've used this method, I always peg down my hearth to stop it moving, makes the whole process much easier and gives you more control. Once you have pegged down your hearth cut a long groove up the middle as a guide when pushing the 'tool' stick up and down. This also exposes some of the dryer pith of the hearth which I find helps make embers quicker. As with the Bow Drill you will need to cut a small triangle out on the side away from you on the hearth for 'dust' to collect up in and form the ember. Don't forget to put your leaf or wood in under that end to catch the ember itself. Then it's just a case of finding the right pressure and timing when pushing the tool stick up and down along the hearth. I've managed to get a fire using pine with this method, but there are other trees you could use.
.jpg)
Hand Drill
Of all primitive fire making methods this is probably the oldest known to man, and is still practiced by many indigenous tribes around the world
It's basically the same as the 'Bow' and the 'Stick' methods, but just less to make. All you need is a Hearth, a tray and a drill. Using your hands you twist and push down from the top of the drill to near the bottom to create friction. The more constant you are in your pace and pressure the easier to create an ember. You will need to cut a grove or notch for the dust to fall onto the leaf and build up to create an ember.
I'll be completely honest here, folks. I've probably only ever managed to get maybe three fires using this method. For me personally, I find it harder than all the other methods and much prefer the 'flint and steel'. I've done it, but I'm no way an expert in this method.
Fires
Make sure that you plan your campsite first. Clear the area of debris. Make sure there are no overhead branches or rocks from overhangs that can fall on your fire or camp. If camping in a woodland or forest clearing make sure there are no overhanging branches that could catch fire. If camping on ground that is rich in 'Peat' make sure that you DON'T place your fire directly on the soil, clear the area and place large stones or rocks over the whole area and put your fire on the top of them as you do NOT wish to start a forest or moor fire. Never let a fire get out of control and always remember, Safety first.
.jpg)
Standard Camp Fire
The most common campfire used all over the world. Fire in this way has been used for hundreds of thousands of years and is ideal for cooking on. It's very basic and easy to prepare. Once you have done all your checks and have decided where to place your fire, your camp and your tent or shelter. Clear the area of debris and collect your firewood. All fires need three things oxygen, fuel and heat. To burn a successful fire, you'll need three types fuel: tinder, kindling and firewood. Tinder includes small twigs, dry leaves, needles or forest duff. I like to use wood shavings from larger pieces of firewood I've collected, and also sometimes use 'Horseshoe fungus' when available to help get things going. Kindling consists of small sticks, typically less than one inch around. Firewood is any larger piece of wood and is what will keep your fire going long into the night. I like to 'feather' the first layer of firewood with my knife or axe, so that it catches fire easier. I also try to collect dry tinder while walking to help keep it dry on my person, and have found it easier to get a fire going later with that. If branches where I intend to camp are wet, it never rains in the Highlands (lol), I find the right wood and strip the bark from the trees and usually I can get a fire going with them once I've feathered some. It's a good idea to try and get as much fire wood as possible to last you throughout the night, but always remember to never leave a fire unattended.
.jpg)
Swedish Log Candle
The quickest way I know of getting a coffee on in the wild, it's super easy to make. Cut a log to size, I usually go for about 12- 16 inches. Cut into four. Pack your kindling and tinder in the middle and secure round the outside. I sometimes use small branches hammered into the ground around the edges, but you could use paracord. There is now even a Swedish Stove Grill Plate available that just sits on the top, very quick and easy to use. Doesn't burn to long, depending on the wood you use, I try and use pine or birch, however the flame is more intense and heats coffee, a pot of water, or a frying pan up extremely quickly compared to a regular campfire. Highly recommended you try this one, folks.

Long Log Fire
This is a hard fire to try and explain in words, so if you copy my wee diagram you won't go wrong, folks. Pack loads of kindling all the way along between the bottom two logs and light in a couple of places. Make sure you put the 'X' supports and anti-slip supports in as per the diagram. As the middle of the logs burn the top one falls more onto the bottom two, making the fire last longer, and the slip supports stop the bottom logs from rolling out, potentially towards your shelter or tent. This is an ideal fire if it's cold or in winter, and will burn for between 4 - 6 hours. Not the best fire for cooking on, but you could do a small regular fire, or make a Swedish Log Candle at one side for cooking and coffee?. I like the reflector wall to send heat into my shelter, sometimes I'll put one each side of the back one and place them at an angle to help direct more heat my way. Great fire area to have with a bushcraft shelter. Love camping with this fire.
.jpg)
.jpg)
Dakota Fire Hole
The 'secret fire' Used a lot in wartime and while on special ops because the actual fire is burred so there is less visible flames and is harder to spot in the dark. Also said to be used by some poachers at night. Sometimes takes a little time to dig depending on the type of soil. Do NOT ever use in soil that is rich in 'Peat' and ALWAYS clear the area of dead or dry leaf matter etc. As always, common sense, people.
Dig The Pit
Dig a hole about a foot (or less) in diameter and about a foot deep. It’s helpful to enlarge the bottom of the pit by several inches to accommodate longer pieces of firewood than the surface hole diameter. This will be the chamber of the fire pit.
Airflow Tunnel
Next, dig the airflow tunnel. Dig the airway tunnel beginning about one foot away from the fire chamber hole. The diameter of the airflow hole should be about six inches and will angle down towards and into the bottom of the main fire chamber. Ideally this airflow hole should be upwind from the main fire hole.
Kindling / Twigs / Sticks
Fill the fire pit partway with kindling and light the fire. Gradually add sticks to build a stronger fire. The fire creates a suction which is drawn into the airflow tunnel, resulting in a much hotter and efficient burning fire.
Advantages
The fire burns very hot.
– Less firewood is needed than conventional fire methods.
– Food or water will cook / boil faster.
– The efficiency of the burn creates less smoke, which means less visibility.
– This method is particularly useful and manageable if it is very windy compared to other methods.
– The fire burns below the surface of the ground which shields the flame from being seen, especially at night.
Since the fire is below the surface, green sticks across the top of the hole, or other methods can be used to easily support cookware.
When finished, the evidence of a fire is easily removed when you fill the holes with dirt and cover the surface with natural surrounding material.
Foraging
A look at some useful, edibles and interesting plants, and some trees
while wild camping in the Highlands.
Useful Plants
.jpg)
Horseshoe Fungus ( Spongan - Gaelic )
( Formes Formentanus - Latin ).
This can mostly be found on Birch trees, but sometimes on Beech and even Sycamore. It's brilliant if you want to transfer a fire from your last campsite to the next if wild camping as it smoulders for ages. To prep for charcloth you'll need to remove the hard outer layer and cut the next layer into slices and then 'cook' inside your char tin until it stops 'smoking'.
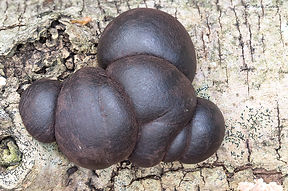
Cramp Ball Fungus ( Daldinia Concentrica - Latin ).
Usually found growing on dead or dying Ash trees, growing often in clusters on the trunk or branches, they resemble lumps of coal, and are also known as 'Coal Fungus', or 'King Alfred’s Cakes'. These can be picked off the tree and used to take a spark when dry. Avoid picking the denser brown coloured fungus and go for the black ones which sound slightly hollow when tapped. Cramp balls are quite common in the UK and can be found in North America and parts of Europe but less frequently. The fungus can grow from 2-7cm in diameter and when broken reveal a silver and black inside. These silver rings that you can see are growth rings similar in what you would see on a felled tree. Each layer or concentric ring represents a season’s growth. To use the fungus as a tinder collect a dry specimen and drop a spark from your fire steel on to the inside surface. If successful you will see a small orange glow appear. Blow gently on this and you will see the heat spread through the fungus in a similar way to a charcoal briquette. Once ignited the Cramp ball is quite hard to extinguish and can be left to smoulder away for a long time. When the Cramp ball is producing heat place tinder in contact with the hot surface (dried grasses are excellent) blow and you will have fire.
.jpg)
Sphagnum Moss ( Mointeach liath - Gaelic ),
( Sphagnum Sphagnum - Latin).
Grows throughout the year from Jan - Dec. Sphagnum mosses can soak up more than eight times their own weight in water. Approximately 5cm for an individual plant, but hummocks can be as tall as 1m. There are at least ten species of Sphagnum moss in the UK, which are very difficult to tell apart. These species range in colour from red and pink, to orange and green. Sphagnum moss plants are very small, but they grow together in close proximity forming spongy carpets. Gathered commercially from Scottish woodlands for the horticultural trade (hanging baskets) and for floristry (wreaths). They also have antiseptic qualities. Useful for soaking up blood on wounds, and was once dried and packed into bags at a Red Cross Supplies Depot to make dressings for the wounded. Our Highland ancestors would have used them as sanitary towels and placed inside nappies. It's also good for soaking tired feet after a long hike. Tried this a few times and it does help. When dry it can also be used over small branches for bedding.
.jpg)
Yarrow ( Lus Chosgadh Na Fola - Gaelic). Plant that clots the blood.
( Achillea Millefolium - Latin).
Also known as Soldier’s Woundwort, Thousand Weed, Bloodwort, Staunchweed, Herbe Militaris. It flowers from June to September, with flowers being white or pale lilac which appear like minute, flattened daisies. Yarrow too is a member of the daisy family. The whole plant is finely hairy, with white, silky hairs. Yarrow leaves can be eaten as a food, raw or cooked though it is not primarily known as a food. The leaves are slightly bitter, so best used as an addition to salad rather than as a main ingredient. Best when young. If you want to gather Yarrow for wounds in a first aid context, its leaves can be picked most of the year. It can be rubbed onto cuts and wounds, and can also be taken in a tea. In the Scottish Highlands, Yarrow was used in healing ointments and was burnt as an insect repellent, and it was considered lucky to attach a sprig of yarrow to a child’s cot to bring a long and healthy life. Yarrow is a versatile herb with many internal & external uses, so a wide range of preparations can be made: teas, tinctures, vinegars, ointments, creams, poultices. Yarrow combines well with Nettle, Hawthorn, Miseltoe and Lime Flowers for High blood pressure; and with Elderflowers, Peppermint, Cayenne and Ginger for colds and feverish conditions. The herb is associated with masculinity, power and virility. It is also known as Nosebleed, for its ability to stop bleeding from the nose, though some state to the contrary, that the leaf stuck in the nose can relieve headaches through causing a nosebleed, and was used for divination in spells, or to reveal one’s true love. Pollen from Yarrow plants among other medicinal herbs was discovered at a burial site for a Neanderthal man as long ago as 60,000 BC, indicated the importance of this plant throughout human history.
%201.jpg)
Devil's Bit Scabious ( Grèim An Diabhail - Gaelic )
( Succisa Pratenis ).
June - September. A tall plant with rounded purple-blue flowers that look like a pincushion. Devil's-bit scabious is related to the 'teasel' and prefers to grow in damp areas. It is popular with bees, moths and butterflies With its round violet-blue flowers and protruding reddish anthers, it is easily mistaken for 'sheep's-bit'. It has some medicinal qualities and the tubors can be washed and chewed for toothache. According to one legend, the Devil grew angry about these medicinal properties and tried to get rid of them by biting the roots off. Hence why this wildflower has short and stubby roots and why it is called 'Devil's-bit' scabious.
Wild Edibles
Note: Although there are many more wild edibles available in the wild, if you know where to look and how to properly identify them. However, I have listed the ones that I am familiar with and have used in the field, either to add to porage, bannocks, fish, or just as an additional wild salad to accompany a meal. Remember folks, if you're not sure exactly what something is, it's probably best not to eat it. Safety first at all times.
.jpg)
Blaeberry ( Lus nan dearc - Gaelic )
( Vaccinium Myrtillius - Latin ).
Found all year round, but it fruits July - September.
Also known as Bilberry; Whortleberry; Whinberry and Wimberry, it's basically like a wild Blueberry. Found mainly in Oak woodlands and open heather moorland.
Perhaps more than any other wild fruit, blaeberries can bring out the primitive hunter-gatherer in us. People have been picking the purply-black fruit since prehistoric times. It's thought that this was one of the plants the ancient Picts used to paint themselves blue.
It's full of sugars and I often use it in my porridge to help add flavour, and put it in oatcakes when cooking over the open fire, and also sometimes in my bannocks for some added energy while wild camping. They have all kinds of health-giving properties, and can protect against cancer and heart disease, infections and viruses, even upset stomachs.
If you decide to go picking, remember not to completely clear an area or damage the bushes. Other animals, like red grouse and ptarmigan, also enjoy feasting on the fruit and shoots. Our ancient Highland ancestors believed it helped them to see in the dark.

Brambles / Blackberries ( Smeurach - Gaelic).
( Rubus Fruictosis - Latin )
Blackberries are normally at their best at the end of August - Mid October. Legend has it any picked after the end of this month are best avoided, as the devil is said to have peed on them. We're not sure this is true, but by October the damp weather will have certainly soiled many crops.
The blackberry has been foraged and enjoyed for at least 8,000 years according to archaeological evidence. They should be shiny and firm when you pick them, though fruits do seem to vary in flavour from place to place. You find them in hedgerows across the country, and aren't restricted to rural areas – they're regularly spotted along canal paths and across wasteland in towns and even cities.
The family also includes raspberries, and it's more difficult than you might think to tell the two apart. There are black raspberries and red blackberries, and the only way to be certain is to pick one; the blackberry will come away with the hard centre, or receptacle, retained within the fruit whereas that of the raspberry will be left behind on the plant.
If you are collecting while hiking and want to use them later then try to keep blackberries dry when storing and they should last for two to three days, but make sure you don't squash them. I use them in porridge, oatcakes and bannochs for added flavour, and the sugars help give you more energy while trekking.
A good source of vitamin C, and also dietary fibre in the multitudinous tiny seeds. They also contain a mild analgesic in the form of salicylates; useful in combating the effects of an autumnal sore throat, but potentially less helpful to people with an allergy to asprin.
.jpg)
Wild Garlic ( Ramson ), ( Creamh Coille - Gaelic )
( Allium Ursinum - Latin).
In late spring you will probably smell this first before you see it. Grows like a carpet through woodlands.
Almost all parts of wild garlic are usable, including the leaves, stems, bulbs, seeds and flowers, be sure to wash them well. Try not to dig up the bulbs as the plant won't grow back the following year.
I only use the smaller leaves and the seeds. The flavour doesn’t survive cooking for long so it’s best to add to cooked dishes near the end. Wild garlic are perennial evergreen plants, and keep their leaves in most winters. Wild garlic thrives in well-drained soil, rich in organic matter, but it will grow in almost all soils. I use it with fish, sometimes with wild seafood, and have even put it in oatcakes cooked by the campfire when wild camping. Lovely.
.jpg)
Wood Sorrel ( Feada Coille - Gaelic )
( Oxalin Acetosella - Latin).
April and May is the best time to see this little edible, although I have seen it in January and even in some winter treks.
This looks much like a three-leaf clover and was a sacred plant to the Celts. It's believed that St. Columba used it to teach the Holy Trinity.
They like shady areas and can be found growing in clumps in moss and on fallen tress. It has a sour taste and is useful if you run out of water on long treks as it has thirst quenching properties. The leaves, flowers, and young green seed pods are all edible having a mild sour flavour that some say resemble lemons. I've sometimes use it in my porridge, and have mixed it with wild Garlic and cooked it with fish. The underside of the leaves sometimes have a purplish tinge and light on top.

Hazelnuts ( Crann Calltainn - Gaelic )
Also known as filberts and cobnuts, hazelnuts begin to ripen as hazel tree leaves change colour. Most ripe nuts are found in September and October, depending on the weather.
To become edible for humans, the nuts have to grow to full maturity and dry out a bit. Hazel trees are a UK native species found in woodland areas, scrub land and hedgerows. If you find hazelnuts in the wild, they’ll almost certainly be young and green. This is because birds and small animals tend to take them before they can mature into the edible brown nuts we’re familiar with. But with a little extra effort, you can still enjoy these tasty treats.
.jpg)
Chanterelle ( Cantarnaid - Gaelic )
( Cantharellus Cibarius - Latin ).
August is a good month to find these. Yellowish in colour, this is a lovely looking wild mushroom and can be found in small groups in woodland, more often with beech or birch, sometimes in Scots pine, oak and even sitka spruce, especially in the highlands.
Although not as good in flavour as Ceps or Morrells, they are a prized delight to come across, but be careful of other foragers as they can be quite very territorial over their Chanterelle patches!.
Unlike other types of wild mushroom is that they are not susceptible to maggot infestation and will happily lounge in damp moss and grass for several weeks without deteriorating. There are also False Chanterelle's (Hygrophoropsis Aurantiaca), so be careful. They tend to be darker in colour, but are not a life-threatening mistake should you make it, as the imposter is edible, though not nearly so good and may cause mild hallucinations for some people. I can say that, I've had this happen to me.

Primrose
( Primula Vulgaris - Latin ), ( Sòbhrach - Gaelic).
Primula vulgaris, the common primrose, is a species of flowering plant in the family Primulaceae, native to western and southern Europe, northwest Africa, and parts of southwest Asia.
One of the first plants to show in the spring, but usually found right in woodland areas up into the Autumn months, and usually in abundance. They grow in clumps in a rosette type formation. You can eat all parts of this plant, including the flowers. The leaves have a slightly sweet taste similar to lettuce. The flowers, leaves and stems can be eaten raw, but it's always best to wash them properly first, cleaning them in boiling water is best. You can also dig the whole clump up, and after cleaning thoroughly, you can eat the noodle-like roots as well. The roots are packed full of carbohydrates, starch and fibre. I quite often take some smaller leaves when making a wild salad.

Thistle
( Cluaran - Gaelic ).
Cirsium is a genus of perennial and biennial flowering plants in the Asteraceae, one of several genera known commonly as Thistles. Thistle is the common name of a group of flowering plants characterised by leaves with sharp prickles on the margins, mostly in the family Asteraceae. Prickles can also occur all over the plant – on the stem and on the flat parts of the leaves.
The thistle has been an important symbol of Scottish heraldry for over 500 years. It also represents one of the highest honours the country can give an individual.
I have to admit that this is not something that I have done many times, but however, when I have been stuck and ran out of food, it is something that I have used on occasion as nettles are just about everywhere.
Use you knife or a stick and dig up the tap root. These can be quite big. Shake off all the dirt and wash thoroughly. Use your knife to peel the tap root and you can then eat it raw. It is rich in sugars, carbohydrates and calories, and will help keep you going until you can find something else. You can eat the leaves if you process them properly, but apart from the odd tea from top-most small leaves, I never bother with them. There is usually something easier to process in most occasions.
Interesting Plants
.jpg)
Butterwort ( Mòthan - Gaelic )
( Pinguicula Vulgaris - Latin)
May - July. Of all the carnivorous species found in Scotland, from the same family as the Venus Fly Trap, this is the one you’re most likely to see. That’s chiefly because of its odd appearance when seen from above, when its star-like clump of lime-green, yellowy leaves stand out against the dark peat or vegetation. In summer it flowers quite beautifully on a long stalk with a purple flower, and even at a modest 5 to 10cm tall it can be hard to miss. Also known as bog violet, it’s an alien-looking plant quite unlike anything else you’re likely to encounter during a day in the hills. Likes damp, nutrient poor sites such as bogs, fens, wet heaths and crevices in rocks and is found all over Scotland, Wales and the North of England. It is considered a magical plant in the Scottish Highlands & Islands. On the Hebridean Island of 'Colonsay' if you picked Butterwort, it protected you from witches. If you fed it to your cows, they would be safe from elf-arrows and their milk would have magical properties. The leaves have also been used in the north to steep in milk and to curdle or thicken it it. The name 'Butterwort' comes from the fact that the plant is a protector of milk and butter, and has been used to rub on cow's udders like the Buttercup. It was believed that it would keep away bad spirits, used was also used in love charms and potions and was believed that it would help make someone fancy you.
Useful Trees found in Scotland

Silver Birch ( Betula Pentula ).
Despite its graceful appearance, the silver birch is one of Britain’s hardiest trees. In the past its said that sacred properties made the birch useful for expelling evil spirits.
A natural pioneer species, it seeds freely and is able to colonise open land with a preference for lowland. The silver birch ( Betula pendula ) is found throughout the country on light, dry soils and is a valuable conservation species. Its pale, smooth timber is a hardwood and silver birch timber is often used in plywood production, brush backs, toys and reels. On a lesser scale, the twigs are cut to make besom brooms and horse jumps. One of the most useful trees when it comes to bushcraft the Silver Birch is easily identified by its white bark. Silver Birch often hybridises with the downy birch, the latter of which is, in terms of the UK, most commonly found in Scotland. One of the most versatile trees in terms of bushcraft. The Silver Birch can be tapped for refreshment in early spring. The bark is also an excellent fire lighting resource and with pine resin and charcoal from your fire it can also be used to create a water-tight vessel for capturing water or for drinking from. It's bark can even be stripped and used in the construction of the famous birch-bark canoe.
-
Lifespan: 120 years
-
Height: Up to 24 metres tall with spreading lower branches and the rest pointing up.
-
Leaves: Triangular, which turn yellow before falling.
-
Bark: Its silvery-white upper bark is papery and peeling.

Scot's Pine ( Pinus Sylvestris ).
Scot's Pine is the only truly native pine in these Islands. It thrives in heathland and is widely planted for timber, but is also found in abundance in the Caledonian forest in the Scottish Highlands. Scots pine is beneficial to much rare wildlife, including the Scottish Wildcat and the Pine Martin. When you're in any evergreen woodland or forest the trees that surround you are an amazing resource in any wild-camping or bushcraft scenario. From Pine, Spruce and other evergreen trees you can harvest 'Fatwood', 'Resin' and the dry dead branches on the lower parts of the trees can all to help you make and sustain a fire, even in the wet. You can also use Pine needles to make a tea. Overall, a very useful group of trees.

Hazel (Corylus Avellana).
Hazel is one of the most useful trees for its bendy stems and as a conservation saviour. From a bushcraft perspective, Hazel is one of the three gems for me, behind Silver Birch and Pine. It's long, straight branches are great for walking sticks, it's thinner branches can be twisted into cordage, you can fashion pan handles, tent pegs and wattling walls to help shelter your tarp in bad weather. You can harvest the nuts from it in late summer, and it can make a good bow drill and hand drill. Very useful tree.
'Highlander' Campfire Cooking

Traditional 'Scottish' Wholemeal Bannoch
( Full Cookery Book Recipe ).
225g Wholemeal Bread Flour
110g Self-Raising Flour
120g Rolled Oats
2 tbsp Castor Sugar
2 tsp Baking Powder
1/12 tsp Salt
2 tbsp Melted Butter
180ml Buttermilk ( or Water )
Method
Add all the dry ingredients to a bowl and stir together.
Add the melted butter, and half the water or buttermilk and stir.
Now add the remaining liquid a little at a time until the flour comes together into a stiff dough. Pat into a rough circle place on an iron griddle or in a dry skillet on medium heat and cook for about 10 minutes per side until well browned, and allow to cool a little before cutting into segments and serve.

Best 'Bannock' Campsite Version.
2 1/2 cups Flour ( I use white, but you can use wholemeal, or any other ).
2 tsp Baking Powder
1/2 tsp Sugar
1/2 tsp Salt
3 tbsp Vegetable Oil
1 cup Water
Mix all the dry ingredients in together and slowly add the oil and water, don't add all at once. Mix in slowly while mixing the dough.
This is the best version I know because you can cook it in different ways and add stuff to it, so even though you are using the same ingredients you never get bored, even if it's all you eat. Here's why.......
Cooking Method #1: Savoury: Cook it straight on your open fire until golden brown each side. It puffs up when it's ready. Makes a great 'Flatbread'. I sometimes add wild mushrooms and wild garlic for extra flavour. You could add cheese if you have some. If you have a pot of stew on the go, or a modern cook-in-the-bag curry or the like, this bread goes great with that. If you don't want to cook this straight on the fire coals you can cook it flat on a flat board tilted towards the fire, then turn when it's golden brown.
Cooking Method #2: Savoury: If your fire is a bit messy and you don't have a clean pan or pot you can strip the bark off a stick and wrap your bannoch around the top of the stick and lean over the fire and turn while cooking until golden brown. As with cooking on the open fire, you can add wild ingredients to this too.
Cooking Method #3: Sweet: ( Shown in photograph ). Shallow fry in some oil in a pan until golden brown the flip over and do same on the other side. When you cook it like this it puffs up and looks like doughnuts. Sprinkle with some cinnamon and sugar. When I cook bannocks like this and I can find them, I also add some Blaeberries or raspberries for extra flavour. Lovely.
.jpg)
Scottish Oatcakes.
Oatcakes are considered the Scottish National Bread and have been documented to have been made in Scotland as far back as 43 A.D.
4oz Oats ( Porridge ).
Pinch of Sea salt
1 tbsp Hot Water
1 tsp Butter ( Or animal fat. You can use fat collected from cooking bacon ).
1). Mix the oats and salt together.
2). Add the butter to the oats and mix into a dough.
3). Add the water and mix again.
4). Add a little more oats to stop everything sticking.
5). Roll up into wee balls and roll out until approximately 1/4 inch thick.
6). Place on a griddle, flat board propped on it's side next to the fire, or on a flat stone over the fire.
7). Cook slowly until golden brown then turn over and cook the other side. Lovely.
You can also add other ingredients. Some people also add 1/2 tsp of Baking Soda. I like to add wild garlic for extra flavour. I've sometimes carried curry powder on hikes and added some of that, that's very nice. You can also add some wild fruit like Blaeberries or chopped Raspberries. Anything extra that you add will make it taste different every time, so you won't get bored of them. I usually
just use rough measures when I've made these and they usually taste just fine.

Scottish Porridge
Well, what Scottish or Highland hike or trek would be complete without one of our National dishes. Nothing warms you up better than piping hot oats first thing in the morning.
Boil some water and add your oats and stir in together, then add either salt or sugar, depending on your personal taste. I usually add some wild Blaeberries when wild camping. If I cannot find any I pit a knob of butter in the middle as the extra fat from that helps give you more energy when trekking the hills.
Most of what I have learned has been learned while out and about in the countryside, in the hills and mountains, and on various and numerous treks and hikes over many years since I was about 22. Now, in my mid 50's, I still feel a great passion for what I do. There's nothing like being in touch with nature and being out in it no matter what the weather. Reaching the end of a trail or the summit of a mountain and knowing that you have used buhcraft skills learned along the way only adds to the great sense of achievement when you are done. I believe that everyone should learn at least some Bushcraft or Wilderness skills, even if it's basic fire lighting and shelter building. You never know when skills such as these could help save a life.
Below are some of my books that helped me to learn various skills through the years.
They have all been invaluable.


.jpg)
.jpg)
.jpg)

"Remember folks, leave nothing behind except footprints and jobbies".
Take all your rubbish with you.
The Countryside should be respected and cared for.
I'll cover some of the above in more detail in videos on my YouTube Channel.
I hope that you have found this page useful and informative.
Any questions, please feel free to contact me via the 'Home' Page or via comments on my new YouTube page
@ 'Highland Dave 66'

